
Brakes, Technical Tips, 1986-90 5000/200TQABS Problems: Wheel Speed Sensor Problems: The ABS Wheel Speed Sensors located at each wheel hub consist of a permanent magnet wrapped with a coil of wire and are referred to as Inductive type sensors. The metal teeth on the CV joint hub pass by this Inductive sensor and generate a current due to the change in magnetic field around the coil of wire. The signal that is generated resembles a electrical "sine wave". 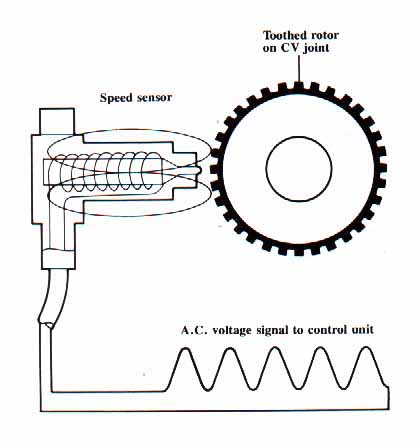 Diagram courtesy of Audi of America, Ref 1 Generally, if you are having problems where the ABS light comes on after driving the vehicle a short distance, it is caused by a low output signal from one or more of the ABS wheel speed sensors. Often happens after some work is done to the front suspension or if a wheel bearing is replaced. The sensor on the 1986-88 Audi 5000 and some of the Audi 80/90 vehicles required a new plastic tip to be installed on the sensor tip. 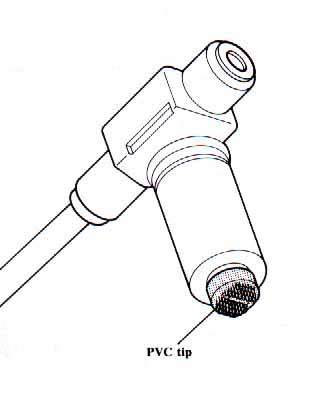 Diagram courtesy of Audi of America, Ref 1 This plastic tip or cover is used to position the sensor tip at the correct distance from the reluctor toothed ring on the CV joint hub when the sensor tip is installed and pushed all the way in. The later 1989-96 Audi 100/200/S4/S6 cars have a push in design ABS sensor that requires the sensor be pushed in until it bottoms out, then the outer Collet retracts the tip slightly on its own. 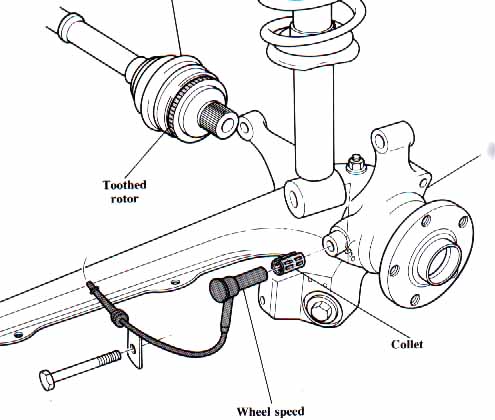 Diagram courtesy of Audi of America, Ref 2 Sometimes you can eliminate these ABS sensor problems by simply removing each wheel speed sensor tip, cleaning any metal fragments off the tip of the sensor, and by using some compressed air to clean off the CV Joint hub teeth. If the CV Joint Hub teeth are excessively corroded or rusted, you may need to replace the CV joint to eliminate the problem. Sometimes these CV Joint hub teeth get damaged or smashed during repairs and this can cause signal changes as the smashed metal teeth pass by the magnetic ABS sensor tip. Other possibilities for these ABS problems, is the sensor wiring was stretched and possibly damaged during the front end, axle or wheel bearing repair. There usually is one ABS sensor connection plug on the firewall area on the passenger side at the rear of the engine compartment and another connector below the coolant reservoir. The rear ABS sensor connectors are located underneath the back seat bottom. The 1986-93 Audis are tough to diagnose as their ABS Control Units did not have Self diagnostics enabled and were not connected to the diagnostic connectors use for Engine, transmission and in some cases the climate control diagnostics. Most Audis starting in 1994 have the ability to interrogate the ABS control unit and look for any stored faults related to the wheel speed sensor output. For the 1986-93 Audis without the ABS self diagnostics, the only good way to diagnose problems related to low signal output from one of the ABS wheel speed sensors, is to find a shop with an oscilloscope. The shop can disconnect the ABS control unit usually located underneath the back seat bottom, then raise the vehicle off all 4 wheels, and run the engine with the car in gear to spin all 4 wheels. Now they can use the oscilloscope to view the electrical signal output from each of the sensors at the ABS control unit connector pins and look for one sensor output that is much lower than the rest of the sensors. Keep in mind that the wheels need to be spinning at about the same speed for the amplitude and frequency of the signal to be the same. The signal output from these Inductive type magnetic ABS wheel speed sensors, is a sine wave with increasing amplitude and frequency as the wheel speed is increased. A few pictures of the typical ABS sensor electrical waveform can be seen on this page. Poor Ground Wires at the ABS Control Unit I have also found some ABS type problems that were related to poor ground wire connections for the ABS control unit, these ground connections are usually to the body near the battery location and can get corroded and cause the ABS light to stay on when the engine is started. Brake Light Flashes Brake Fluid Level
Low? Emergency Brake Lever Switch?
Rear Brake Proportioning Valve The rear proportioning valve connects via lever and spring to the rear suspension to reduce the fluid sent to the rear brake calipers when the rear suspension rises up during normal weight transfer during hard braking. The valve can get stuck and in some cases can be taken apart and cleaned, see photo below. Use a punch to remove the lever pivot pin and then a 15 mm 6 point socket to loosen the piston, then pull out the piston. Use Brake clean on the piston and inside the housing. Reassemble with clean brake fluid or brake assembly paste.
Brake Pad Wear Indicator Brake Hoses, Checked Them LATELY? The other day, I noticed my brake pedal felt a little spongy, so I decided to bleed the brakes and flush out the old brake fluid. As I began bleeding the front right brake using a pressure bleeder providing ~15psi pressure, I noticed the rubber front brake line was swelling up like a balloon in several places......Kind of like having an aneurysm in your artery. YIKES!! In some cases only the outer rubber protective sheath is cracked, and the inner braided hose is ok...but it is wise to replace these on higher mileage vehicles. This is not good, and surprised me a bit, even though it really shouldn't as the car has over 130,000 miles on it. CHECK THOSE RUBBER BRAKE HOSES SOON. YOU MAY WANT TO REPLACE THEM IF YOUR CAR HAS OVER 100K MILES ON IT! High Performance Brake pads High performance brake pads can be fitted on the Audis to improve their performance at the track. The stock brake pads often transmit too much heat into the caliper piston and brake fluid when pushing the brakes during a race track event. This heat transfer will cause the fluid to boil after several lap sessions and a loss of braking capability. Here is a photo showing the stock brake pads used on the Audi S4 with G60 Girling Calipers after extreme abuse at Road America. YIKES! Note that the friction material is completely gone and the pad metal backing plate melted into the caliper outline. 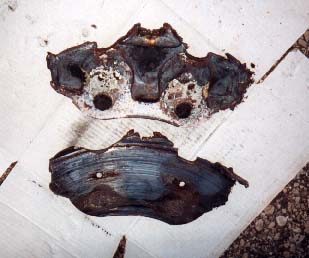 The Performance Carbon/Kevlar brake pads have a ceramic barrier to prevent excessive heat from being transferred to the caliper. These pads by themselves, make an amazing difference in stopping capability. Some of these high performance race/track pads often squeak or squeal really bad and create horrible black dust that can damage wheel finishes when run on the street. You may want to have two sets of pads, a milder set for the street and another set for the track events. Using a high performance DOT 4 brake fluid with a higher boiling point is also recommended when running these race/track pads. ATE Super Blue brake fluid and Motul 600 Racing Brake Fluid work well. I recommend changing your brake fluid each year and before each track event. UFO Brakes: 1991 200TQ 20V, 1990-91 V8 Audi used a unique set of front brakes on the 1991 200TQ 20V and on the 1990-91 Audi V8. These front brakes have the brake caliper mounted on the inside of the brake rotor, which allows the rotor to have a larger surface area and diameter when only using 15 inch wheels. Here is a diagram of these UFO brakes, so named as the rotors look like an Unidentified Flying Object (UFO), aka flying saucer or space ship. 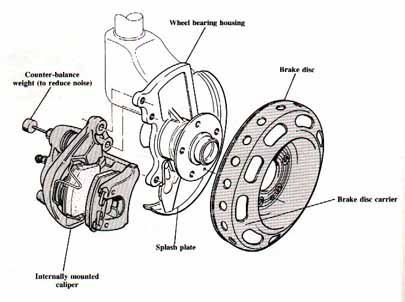 Diagram courtesy of Audi of America Unfortunately, these brakes often suffered from minor warping which would cause a vibration or shimmy during braking. In some cases, doing a few hard stops from 60-80 MPH would actually help straighten out the warped rotors somewhat. Replacement rebuilt rotors often cost ~$250 USD each, which made servicing these brakes expensive. When they are working well, they do offer better braking with their 310mm (12.2 in) diameter rotors, versus the earlier G60 dual piston calipers with smaller 276mm (10.9 in) diameter rotors. After introduction, Audi would retrofit the G60 dual piston calipers and conventional rotors from the Audi S4, along with new strut assemblies on customers cars that complained about the shimmy problem. Unfortunately, the braking capability was reduced with the G60 brake setup. The 1992 and later Audi V8 and Audi S4 used the dual piston G60 calipers and Audi discontinued the use of these UFO brakes. Front Caliper change on some '89-90 200TQ-ATE Calipers not Girling G60 Some of 1989-90 200TQ switched to using a "ATE" brand single piston front brake caliper instead of the dual piston Girling 60 calipers. These single piston ATE calipers use the brake pads with the FMSI-D-394 designation.  A view of the ATE brand Single Piston Caliper 1989 200TQ Driver Side These ATE calipers with the single piston work ok with some high performance Carbon/Kevlar pads but they do have a piston area that is about 15% less than the G60 dual piston GIRLING caliper mentioned below. These ATE Calipers weigh ~11.5 lbs without pads. These dual piston Girling G60 calipers are the same ones used on the '86-88 5000TQ, some 1989-90 200TQ, all with the 276mm diameter rotors (10.9 inch). The G60 Caliper without pads weighs ~13.5 lbs. The G60 Rotor/disc weighs ~14-15lbs ea. These G60 Calipers with different brake lines are also used on the 1992-95 S4/S6 vehicles also with a 276mm diameter rotor, although the S4/S6 have a different part number for the front rotors as they have a different offset. 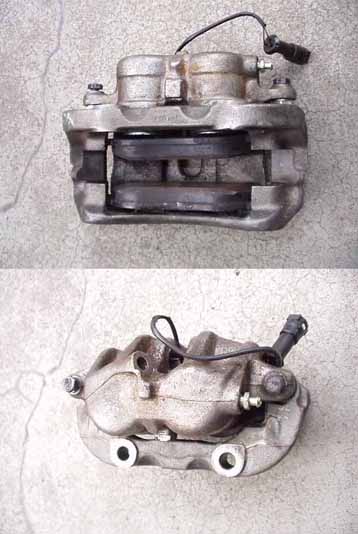 Girling G60 Caliper 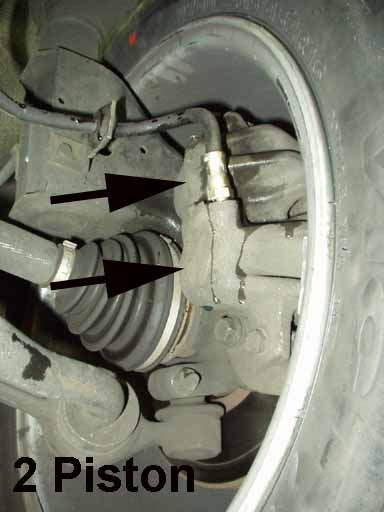 A view of the G60 Caliper installed, Driver side These Girling 60 calipers work great as an upgrade on the lighter ur-Quattro coupes, and they work "ok" on the '86-88 5000TQ/ '89-90 200TQ provided some good High performance brake pads are used. But in my opinion, these G60 calipers and small 10.9 inch rotors don't have what it takes to tackle the stopping requirements for the heavier '91 200TQ (3650lbs), the S4 and the S6 (3800lbs and the Audi V8 (~4000lbs). Aftermarket upgrades to 12 inch rotors with 2 or 4 puck calipers are recommended for these heavier cars and also on the '86-90 5000/200TQ when you want to do repeated high speed braking when driving at speed on a race track. Front Brakes Sticking You should check the brake pedal play and make sure the pedal is not sticking or hanging up which is preventing it from returning all the way. If the pedal does not return fully, the brake servo piston will put pressure on the master cylinder piston and the return port in the master cylinder can be blocked which will not allow the release of hydraulic pressure at the front calipers. The return port in the hydraulic power booster could be restricted or blocked as well but I have not seen this happen. The return port on the Master Cylinder can also get clogged up with crud or the master cylinder piston can get stuck in the bore. In some rare cases, the front rubber brake hoses can swell up and restrict the fluid return from the calipers. The caliper pistons can be also rusted or corroded and sticking, or the caliper mounting bushings could be corroded and prevent the caliper carrier and pads from moving freely. I have also seen some aftermarket cruise control systems cause the brake pedal from returning as well. You should have a technician diagnose these types of problems, as you don't want to lose your brakes! Front Brake Upgrade for 1986-90 Audi 5000TQ/200TQ I ran across an interesting brake upgrade the other day that is apparently used on the A4's. The Audi part number 8N0 615 125 carrier brackets can be used with the A4 calipers to mount the larger A8 312X25mm rotor. The 1997-99 Audi A8 used a 312X25mm front brake rotor that has the correct offset to allow use on the 1986-88 Audi 5000TQ, and the 1989-90 Audi 200TQ. These rotors weigh about 19 lbs each. These A8 312x25mm rotor combined with the 8N0 615 125 Caliper Carrier bracket and A4 Caliper will bolt on with no modifications other than changing the brake hose and allows getting a larger diameter rotor. The stock 5000TQ rotors are 276X25mm. 16 inch wheels will generally be required with this brake setup. Disclaimer: Use the information contained in the above section at your own risk. You assume all risks in connection with installing the brake parts listed below, however indirectly or directly related, including, but not limited to all risks of loss, injury to you, your property, and the property or person of others. Rear Brake Upgrades 1986-90 5000/200TQ Disclaimer: Use the information contained in this section at your own risk. You assume all risks in connection with installing the brake parts listed below, however indirectly or directly related, including, but not limited to all risks of loss, injury to you, your property, and the property or person of others. The 1986-88 5000TQ and 1989-90 200TQ comes standard with 240X10mm non ventilated rear disc brakes. The larger ventilated 269mm X 20mm (10.6 X 0.79 inch) rear disc brakes from the 1991 200TQ 20V sedan and wagon can be installed on the 1989-90 200TQ as well as on the earlier 86.5-88 5000TQ. These larger rear disk brakes can be fitted to the 1989-90 200TQ and the 86.5-88 5000TQ by changing the dust shields, rotors and calipers/carriers. A straightforward bolt on upgrade. I did this on my 89 200TQ and also on my 1987 5000TQ track car and it works very well. The same rear brake pads are used with these larger ventilated discs. The front rear brake bias may need to be adjusted at the rear brake proportioning valve. See the Bentley manual for details. One Audi enthusiast found a different master cylinder with a larger bore to reduce the pedal travel when this rear brake upgrade is done. Here is what he found. I have not tested the use of this master cylinder. Kenneth M. says: "I checked and found out that there is a different master cylinder for the wagon models. It is made of cast iron and has a 2-mm increase in bore size. It makes a big difference in pedal travel." If you are looking for some used parts, the 1990-94 Audi V8 also used the same rear brake calipers, carrier brackets, and dust shields. NOTE: The V8 used a different rear disc brake rotor with a different hub offset and these rotors won't work on the 1986.5-88 5000TQ, or on the 1989-90 200TQ. 1. Audi of America Publication: "Anti-Lock Brake System: Introductory Information for the Audi 5000CS Turbo. 2. Audi of America Service Publication: "The New Audi 100 and Audi 200" Copyright © SJM Autotechnik™ , all rights reserved Return to Troubleshooting Tips page. Return to SJM Autotechnik™ main page. |
| About Us Privacy Policy Terms of Use Links Customer Service Safety Information Home |