1982-85 ur-Quattro Coupe, 1985-1990 5000/200, Turbo and Quattro,
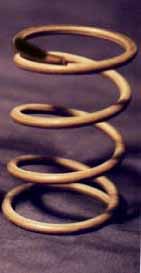
Waste Gate Spring Details:
A stiffer Waste Gate spring prevents the waste gate valve from opening
too quickly before the turbo can produce boost. This delayed Waste
Gate "cracking" improves transient throttle response and allows the
boost to increase at a quicker rate.
1.8 Bar Springs are available for the 1986-88 5000T/Q and for the
1989-90 200TQ when using a modified ECU to allow 1.8 bar boost.
It is very important that you ensure the ECU Waste Gate Solenoid boost
control system, the Wide Open Throttle (WOT) switch, air temperature
sensor and knock sensing system are working correctly, BEFORE you install
a stiffer 1.8 bar Waste Gate Spring after you have installed the 1.8
bar modified ECU.
The stiffer 1.8 bar Waste Gate spring will make the turbo produce
higher boost even if the ECU Waste Gate Solenoid boost control system,
the WOT fuel enrichment system or the knock sensor system are not
working correctly.
Go to the "ABC's
of Running High Boost" page for details on checking the ECU systems
mentioned above.
NOTE: Running the engine with higher boost without the correct fuel
enrichment, without a working air temperature sensor or without the
knock sensing system can damage the engine from detonation (pinging).
In most cases "light" engine pinging will NOT be heard by the driver.
Sustained pinging can eventually lead to head gasket failure or
piston ring land damage.
If you running my modified ECU and 1.8 bar WG spring, you may occasionally
experience the ECU safety feature which shuts off the fuel pump relay
at ~1.95 bar. This can occur with certain air temperatures or if you
have modified your exhaust system for better flow. You will need to
reduce the WG spring tension slightly, by modifying the upper WG cap
to shorten the upper perch length. The earlier 84-85 5000T automatic
vehicles often had an adjustable upper WG cap, which can be used on
the later 1986-90 5000/200T/Q's.
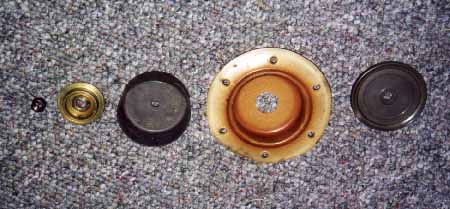
Testing the Waste Gate Diaphragm
Before you remove the Upper Waste Gate Diaphragm cap to install
the waste gate spring, it is a good idea to test the waste gate diaphragm
for any possible leaks. Use a hand vacuum pump (Might Vac or equivalent)
to apply vacuum to the small hose fitting on the top of the waste
gate cap. The upper chamber/cap should be able to hold vacuum, you
can suck it down to about 15-20 in Hg and wait about a minute or so,
to see if the system leaks.
Other Waste Gate system tests can be found at
Waste Gate
and Solenoid Hoses
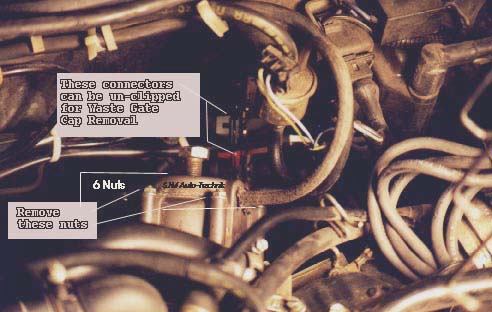
Waste Gate Spring Installation:
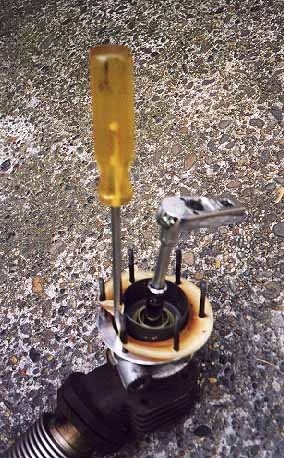
The Waste Gate spring or diaphragm can be removed after removing
the 6 small nuts (8mm, or 5/16) and washers (used on some models)
from the Waste Gate Cap.
On the 1986-88 5000TQ and on the early 1989 200TQ, it may be required
to unclip the 3 connectors mounted on the firewall to allow the Waste
Gate Cap to be removed easily.
You may want to mark the connectors to avoid mixing them up, even
though they tend to go back to their original locations.
Here is a photo of the Waste Gate Cap located at the rear of the
engine compartment.
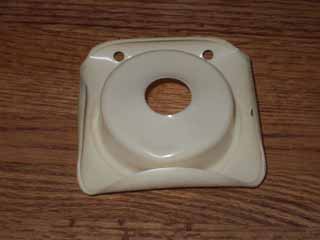
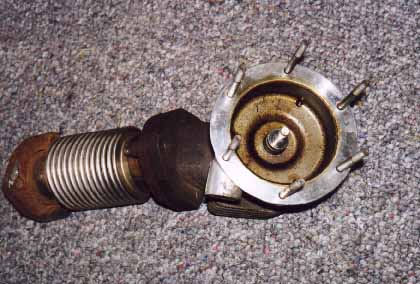
The Waste Gate Diaphragm should be inspected after removing the
Waste Gate Cap. Look for any tears or holes in the Diaphragm. The
picture below shows the Diaphragm after removing the cap and spring.
Install the WG cap over the 1.8 bar spring, while making sure the
spring is centered over the lower spring perch and also that it is
centered against the upper spring perch in the cap. Pushing down the
WG cap over the stiffer 1.8 bar spring requires the use of a large,
(~18 inch) screwdriver or small pry bar. The screwdriver is wedged
against the firewall and used to push down the Waste Gate Cap and
allow you to install two of the small nuts/washers. Be sure to avoid
pinching the wiring harness near the firewall when you slide the screwdriver
between the harness and the firewall as you pry down on the WG cap.
You need to apply even pressure with the long screwdriver to allow
the cap to slide down easily over the studs and compress the stiff
WG spring.
Install the remaining nuts/washers and snug them down using a small
1/4 drive ratchet and 8mm socket. Don't over tighten these small nuts!
Be sure to reconnect the ECU harness connectors at the firewall, or
you will have a car that won't start.....
Waste Gate Diaphragm
Installation:
Five Cylinder 20V Turbo engines: The 20V turbo
engines allow easy removal of the waste gate assembly to allow replacement
of the diaphragm. After removing the wastegate assembly from the engine,
remove the 6 nuts from the upper cap and then remove the cap and waste
gate spring.
Note: Removing the wastegate assembly allows you
to use a allen wrench to hold the valve head and prevent it from spinning
when you remove the upper nut to replace the diaphragm. Additional
details below for the 10V Engines may help as well.
If you are replacing the Waste Gate Diaphragm on 1983-1991
Five cylinder 10V Turbo engines
10V Engine: After removing the WG cap, you need
to pull up the diaphragm slightly from the six studs and then look
underneath for a steel plate underneath the diaphragm rubber lip.
In order to loosen the nut which holds the diaphragm assembly together,
you need to jam a flat bladed screwdriver between the outer Waste
Gate aluminum housing and this round plate that is underneath the
diaphragm. This is not the most elegant way to remove the
diaphragm, but it beats having to remove the entire waste gate assembly.
10V Engine: The nut usually has loctite on the
threads, so it will be pretty tight and tough to loosen. You may need
to use a small propane torch and heat up the nut slightly, to help
break loose the loctite. You need to jam the screwdriver in tight
enough, in such a way as to prevent the Waste Gate lower plate and
valve shaft from spinning. You can try and use a hand operated socket/ratchet
or you can try using an air operated impact wrench to break it loose.
Sometimes the impact wrench ends up just spinning the valve shaft
assembly too fast and prevents the valve shaft from remaining stationary
while turning the nut loose.
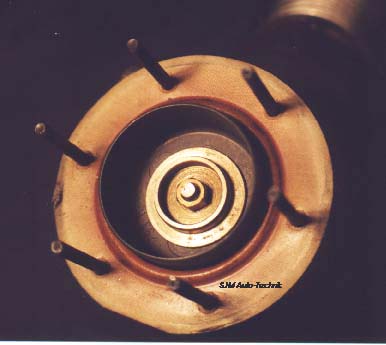
Here is a picture showing the wastegate removed from the engine,
and the components after removal of the top nut and the area underneath
the diaphragm.
Installation is the reverse of the procedure, you may want to apply
some high temperature loctite to the valve shaft threads. Torque the
nut to 14 lb-ft, but use caution to avoid tearing the new diaphragm.
It the Waste Gate valve shaft keeps spinning even with the screwdriver
jammed in, you may have to remove the entire Waste gate assembly from
the exhaust system and use a 10mm Hex allen wrench or wide bladed
screwdriver to insert into the bottom of the Waste Gate valve head
to keep it from turning while loosening the upper nut.
Waste Gate Solenoid Boost Control Details
Normally the stock ECU system can control the WG solenoid can add
pressure to increase the boost above the spring pressure by approximately
0.1-0.4 bar. It is limited to how fast it can raise the boost and
normally for best performance, you want to use the stiffest WG spring
possible which is about 0.1-0.2 bar below the boost map values set
in the ECU. People living at high altitudes may want to limit the
boost map values set in the ECU EPROM code to 1.8 bar and use the
stock or 1.8 bar spring to prevent over-spinning the turbo at high
altitudes.
This same WG solenoid setup can subtract about 0.1 bar from the
boost supplied by the WG spring pressure at sea level. You will lose
more boost at higher altitudes if the ECU controlled WG solenoid isn�t
working. The WG solenoid does this by connecting the upper WG chamber
to the inlet side of the turbo which is at a slight vacuum under WOT
conditions.
To fine tune the WG spring tension and the over-boost response,
I normally modify the waste gate upper cap to allow the WG spring
tension to be adjustable. On the 5000/200TQ, the spring perch can
be removed from the cap after the allen bolt is removed.
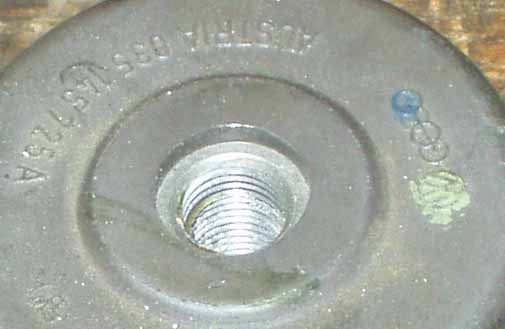
Here is a photo of the Waste Gate cap on the 1986-90 5000/200TQ,
showing the allen bolt
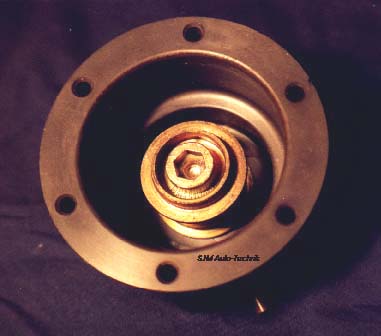
This allen bolt is a pain to get loose as it is loctited in place.
Some times rapping it with a punch can jar loose the threads. Using
an air driven impact gun can also break it loose. Applying some heat
to the cap from a propane torch can also help break loose the loctite.
The ur-Quattro and some of the earlier 1984-85 5000 Turbo vehicles
had a nice WG setup that uses an allen screw and a different spring
perch, making adjustment easier. The ur-Q perch has a wider inner
seat diameter and this is the reason the custom WG springs have a
larger inner diameter.
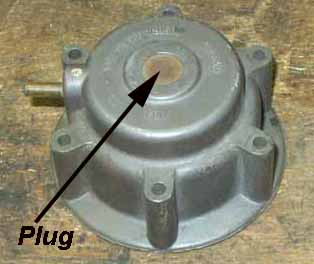
The exterior plug that covers up the threaded area in the cap can
be removed by drilling a hole in the plug, then screwing in a sheet
metal screw, and finally use some side cutters or pliers on the screw
to pry the plug out.
If you get a 50mm long 12mm X 1.25 thread pitch metric bolt, this
can be screwed into the end of the WG cap to adjust the WG spring
tension. You need to slide the original WG spring perch over the bolt
with one thin nut on each side to hold the perch in place. This will
allow its position to be moved up and down. Some people will also
cut the original perch to shorten it for a greater range of adjustment
using a stiffer spring. Two valve spring shims of the correct diameter
can be placed between the spring and the adjustable perch to allow
the perch to be rotated without twisting the spring and the WG diaphragm.
- Important Safety Information
Copyright © SJM Autotechnik™ , all rights reserved.
Return to SJM Autotechnik™ main
page.