|
Transmission, Driveshaft, Differential, Clutch, and Flywheel Technical Info and tips, 1986-91 5000/200TQ
1986-88 Audi 5000 Turbo Quattro, 1989-91 Audi 100/Quattro Audi 200 Turbo/Quattro Manual Transmission and Rear Differential- SYNTHETIC GEAR OIL
If you drive a modified turbocharged Audi with more boost/horsepower you end up putting more stress on the transmission, clutch, axles, Constant Velocity (CV) Joints, suspension system and tires. As you can imagine, doing drag strip launches by revving the engine and dropping the clutch takes its toll on the clutch with all wheel drive. Using a good synthetic lubricant in the Quattro transaxle (Manual Transmission/front differential) and in the rear differential is recommended. The synthetic transmission fluid improves cold weather shifting tremendously and Audi supplied the 5000TQ with synthetic transmission fluid from the factory in the mid to late 80's. The Audi specified synthetic transmission oil is SAE 75/W90 (Mil-L-2105
or API/GL4) with the original G50 designation. The 1992-2004 Audis specify manual transmission oil G 052 911
A2 for the 1.0 liter size bottle, or the Redline Synthetic MT-90 which is a 75W90 GL-4 rated synthetic oil and can be used in the 016 AWD transaxle and others have reported using MT-90 in the 1992 and later Audis with manual transmissions. Some folks have reported better shifting behavior when using the Audi dealer specified transmission oil when compared to Redline and other brands available. In the 1986-88 5000TQ, 1989-91 Audi 100/200TQ, for the Rear Differential
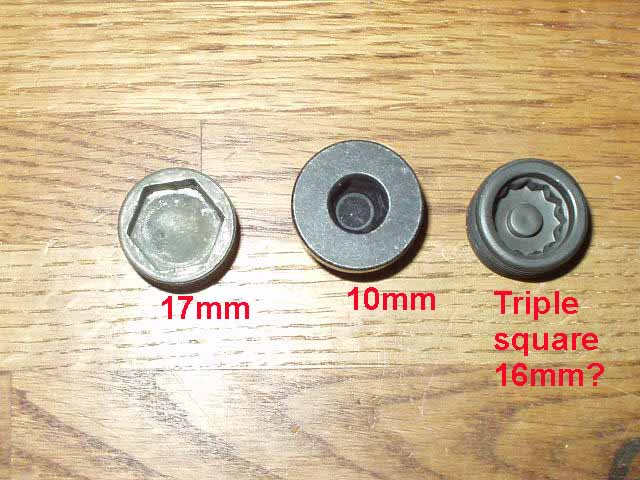
Audi specifies Before draining your fluid, it is a good idea to first loosen the fill plugs as the 17mm hex plug can sometimes get stripped or over tightened and getting them loose can be tough. Some tool manufacturers sell a 1/2 inch drive 17mm allen socket, which works well to break loose the stubborn plugs. Below is the 016 AWD transmission used in the 1986-88 5000TQ's and
the 1989-91 Audi 200TQ's, there is also one more drain plug further
back for the center differential.
For the 1989> Audi 200TQ
There was a change in the filler plug location on the 016 type Quattro transmissions. Beginning in 9/13/1988 the filler hole was raised 15mm and the capacity increased to 2.75 qts.
The previous capacity was shown as 2.33 qts. With the new fill plug position, the transmission is full when the oil level is 7mm below the lower edge of the filler plug.
However, during repairs, or fluid changes, the transmission can be filled up to the bottom of the filler plug hole and this would correspond to filling it with 3.4 qts.
The rear differential takes slightly under 2 quarts, approximately 1.6-1.8 qts. The drain and fill plugs should be torqued to 18ft-lbs
For the 1992-95 Audi S4/S6 The Bentley manual states the O1E equipped 5 speed quattro transmission takes 2.7 quarts plus 0.1 quart of gear oil additive Audi # G 009 000 01 but this additive is no longer available from Audi.
Total would then be 2.8 quarts. I don't know if this corresponds to filling up the transmission to the bottom of the filler hole, but that is the normal procedure.
Oil requirement is G50 (synthetic oil) SAE 75W/90
The S4/S6 Rear diff is listed as taking 1.6 quarts of gear oil, GL5, SAE90, (MIL-L 2105B)
Some VW and Audi enthusiasts use the Redline MTL (75W/80W) GL-4 synthetic transmission oil but I don't recommend this lighter weight oil in the Audi transaxles.
The Red Line Synthetic 75W90 "Gear Oil" is recommended by Redline to be used in the Quattro rear differential.
Here is what Red Line says about the MT-90, the 75W90 Gear Oil and their other gear oils. Product Application:
MT-90 Manual Transmission/Transaxle Lubricant. A 75W90 GL-4 gear oil which is designed for manual transmissions which require 75W90 or 90 GL-4 gear oils or motor oils. Uses the same chemistry as MTL, but is a 90WT in order to satisfy certain manufacturers which recommend a SAE 90 GL-4 gear oils.
75W90 Gear Oil: The preferred product in nearly all car and light truck differentials, both conventional and limited slip. 75W90 is preferred for most racing applications. It contains friction modifier which is recommended for limited slip units. 75W90 Gear Oil can be used in many transmissions and transaxles:however, other Red Line lubricants have better frictional properties for rapid synchronization. Exceeds API GL-5
Other Red Line Gear Oils MTL Manual Transmission/Transaxle Lubricant. A 75W/80W GL-4 gear oil which is designed for manual transmissions which require 75W or 80W GL-4 gear oils, motor oils, or most special synchromesh fluids. It provides low temperature shift ability equal to an ATF, yet will not thin out or shear at high temperatures and provides the substantial gear protection of a GL-4 gear oil. The higher synchronizer coefficient of friction allows faster upshifting and downshifting and the lubricant is non-corrosive to synchros and bushings.
75W90NS, 75W140NS GL-5 lubricants which do not contain friction modifiers for limited slip hypoid differentials. This makes the transmission synchronizers come to equal speeds more quickly, allowing faster shifting and much easier low-temperature shifting. Can also be used in racing limited slip differentials where weak spring design causes too much wheel spin. These products provide significantly more lockup. Some Limited-Slip Friction Modifier may be required for optimum performance.
80W140 Gear Oil Generally used in commercial trucks which will climb long, steep grades and some racing applications where power is not critical. Generally 0.5% less efficient than 75W90. Can also be used in Differentials and transmissions where excessive noise is a problem and limited slip differentials which vibrate excessively when turning a corner. Exceeds API GL-5 gear oil.
LightWeight Gear Oil A 75W/80W GL-5 gear oil designed to lubricate transmissions and transaxles which recommend a 80W GL-5 gear oils. It has excellent low temperature flow which allows easier shifting when cold. Also has good synchro compatibility. May be used to obtain maximum power transfer in racing differentials which do not see high temperatures.
SuperLight Gear Oil A 70W/75W GL-5 gear oil with the viscosity of an ATF. This is used when temperatures are not high and when the maximum power output is required such as in qualifying laps.
ShockProof EP Gear Oil A unique lubricant containing a suspension of solid microscopic particles as an extreme pressure agent. The viscosity characteristics allow the lubricant to resist throwoff and provide a film thickness greater than an SAE 250 grade, with the same low fluid friction as with the 75W/90. Recommended for off-road racing with problem gearboxes. Also available in LightWeight and SuperLight viscosities.
Go to the Redline Oil Web page for more details
Front Axle CV Joints
The front axle CV joints on high mileage cars should be checked, especially if you hear any clicking noises as you accelerate and are turning the car right or left. Check the Bentley manual for details but basically you remove the axles, remove the outer joint, disassemble and clean the CV joint and repack with high pressure moly grease designed for these constant velocity joints.
The inner joint should be cleaned and repacked as well. The rubber CV boots should be replaced at this time as they usually split as a car gets over 120-150K miles.
Any time I have the front end apart on a high mileage Audi for replacing wheel bearings, front springs, or suspension bushings, I go ahead and pull the axles and clean and repack the CV joints and replace the rubber boots.
Front Axle CV Joint/Boot Replacement
The Bentley Repair Manual should be consulted when servicing the Front axles
1986-88 Audi 5000T/Q There vehicle use an outer CV Joint which has a thread stub axle. To remove the front axles, you first loosen the outer large axle nut with the wheels on the ground, and also loosen the 6 inner CV Joint bolts.
NOTE: Before inserting the triple square drive bit into these inner CV bolts, you may want to clean out the dirt/grit from the inside area of the bolt heads to avoid stripping out these bolt heads.
Jack up the vehicle and safely support it and then remove the wheel. Turn the steering wheel all the way to the left or right depending on which side you are working on. After getting the inner joint bolts loose/out, and removing the outer axle nut, you need to remove the lower ball joint clamp bolt/nut and then use a large 3-4 foot long pry bar or heavy pip between the rear body area and the lower control arm to pop loose the lower ball joint out of the strut bearing housing. Be careful to not damage the ball joint boot, you may want to cover the boot with a heavy rag to avoid tearing it up while you remove the axle assembly.
Once you have the axle out of the car with the inner and outer CV joints, you can cut off the outer boot and wipe away some of the grease so you can find the snap ring holding the outer CV joint to the axle. You need to spread apart the snap ring while you tap off the inner race on the outer CV Joint. This can be a tough SOB, as the snap ring tends to pop back in place and hold the thing together while you are trying to tap it off.
The inner CV Joint can be removed after removing the outer snap ring, and then tapping the inner race off the axle. If you are replacing the inner boot, you can cut the boot off to allow access to the inner race and make it easier to tap it off.
1989-91 Audi 100/200 Quattro The 1989-91 Audi 100/200 Quattros came with a different outer CV Joint which has a shorter stub axle and uses a long axle bolt instead of the axle nut. To remove the front axles, follow the information above for the Audi 5000, but you first loosen the outer large axle bolt with the wheels on the ground. Loosen the 6 inner CV Joint bolts.
NOTE: Before inserting the triple square drive bit into these inner CV bolts, you may want to clean out the dirt/grit from the inside area of the bolt heads to avoid stripping out these bolt heads.
These shorter stub axles usually allow removal of the axle by turning the wheel all the way out so you can get the outer CV stub axle out and past the spindle.
You can also pop the lower ball joint out after removing the clamp bolt/nut if you can't get the inner CV Joint on the axle up against the tranny far enough to get the stub axle clear of the strut bearing housing.
Once you have the axle out of the car with the inner and outer CV joints, you can cut off the outer boot and wipe away some of the grease so you can find the snap ring holding the outer CV joint to the axle. You need to spread apart the snap ring while you tap off the inner race on the outer CV Joint. This can be a tough SOB, as the snap ring tends to pop back in place and hold the thing together while you are trying to tap it off. If you have access to a hydraulic press, you can also use a long bolt or drift down into the stub axle end and push on the axle end while you spread apart the snap ring. There is a special tool #3207 that is threaded and can be used to push on the end of the axle as well.
For the inner CV joints, follow the procedure listed above for the Audi 5000.
1992-95 Audi 100/S4/S6 Front Outer CV Joint boot replacement: Same procedure as the 1989-91 Audi 100/200 Quattro, but getting the outer CV joint off is a little tougher on these 1992 and later 100/S4/S6's as they have an internal snap ring that is not accessible. I use a hydraulic press and a long punch or appropriate long bolt inserted into the stub axle end past the axle bolt threads to push the axle off the inner race of the CV joint. As shown in the Bentley manual, there is a special tool #3207 that threads into the stub axle to push on the axle and pop it loose. It would be nice to find a long axle bolt that would also work.
For the inner CV joints, follow the Audi 5000 procedure listed above.
Quattro Rear Axle Assemblies: The rear axles and CV joints generally last a long time (150-250k miles) but they should be checked occasionally to make sure the boots are in good shape. Some people will use a small needle attachment on their grease gun to squirt a little grease into the rear CV boots and then squeeze the boot to push the grease into the joint. Don't add too much grease this way. The boots are not supposed to filled completely with grease.
AUTOMATIC TRANSMISSION, FWD TURBO
People running Turbocharged Audis with FWD automatic transmissions may want to limit how much you increase the boost level over stock, as these transmissions are not very robust. The front differential gear oil should be checked as this gear oil check is neglected on many of these FWD Automatic transmissions. There is a 17mm Hex plug on the side of the transmission for checking this differential oil. When checking the front differential oil, look for any signs of ATF fluid in this gear oil as it is very common for the ATF fluid from the Automatic unit to be forced past the shaft seal and into the Front Differential unit. This lighter ATF fluid will destroy the ring gear in short order.
You should check the ATF fluid level using the dip stick toward the rear of the engine compartment . The fluid should be clear and clean and you can smell the fluid to check for signs of burning. Be careful not to overfill the transmission when the engine/transmission is cold as the fluid level will rise as the fluid expands when it gets hot. Check the fluid only after the vehicle has been driven at least 6 miles and is warmed up. The gear shift should be in park and the vehicle must be on level ground when checking the fluid. Over-filling the transmission can cause the fluid to be whipped up and aerated by the rotating drums inside. This will cause the fluid to foam and loss of hydraulic line pressure will occur. This loss of pressure can cause slippage of the internal wet clutch packs or brake bands and these will be destroyed very quickly when line pressure inside the transmission is below normal. Never continue to drive an Automatic transmission equipped vehicle if you encounter obvious slippage in drive or reverse.
You may want to service the transmission by removing the Transmission pan and clean or replace the filter/screen. It is a good idea to check the bottom of the pan for any clutch plate material or heavy metal contamination. A small amount of fine metal particles is normal wear from the bushings. CAUTION, DO NOT use any rags when cleaning the transmission pan, or internal components. Use solvent and then let the parts air dry. Rag material will often cling to these internal components and can clog up the screen or foul up the operation of the hydraulic system. Working on Automatic transmissions requires absolute cleanliness as any foreign matter or dirt will foul up the hydraulic valves in the valve body.
The Automatic transmission holds a little over 6 quarts of fluid but you can only drain around 3 quarts when removing the pan. The fluid inside the torque converter is not easily drained. Some Automatic Transmission shops have a machine that can flush out all the fluid including what is in the torque converter. Many of the older Ford and Chrysler vehicles from the '70's had drain plugs installed in the torque converter to make fluid removal much easier. These drain plugs have disappeared on most vehicles.
NOTE: FWD cars may become dangerous to drive under high boost levels as they tend to torque steer and this may result in the loss of control and an accident.
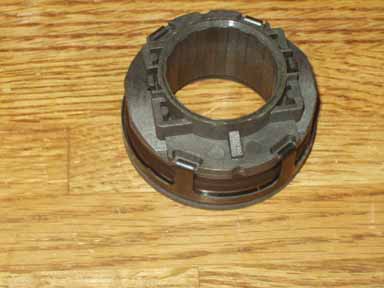
AWD Driveshaft, CV joint and boot replacement, center support bearing.
The Audi parts fiche does not list any replacement parts for the driveshaft that goes from the transmission to the rear differential. The Constant Velocity (CV) joints, the CV Joint dust boots, and the Center support bearing are available.
The center support with rubber center piece is available from a Mercedes application but this part needs to be modified to fit the Audi 100/200 center driveshaft. There is a BMW center support that also needs to be modified to fit the 4000Q center driveshaft.
Center driveshaft Support (rubber mount) and Center support bearing
There is an aftermarket replacement center support rubber mount and bearing available that can be adapted for use as a replacement on the Audi 5000/200TQ center driveshaft. This part requires cutting off the original bracket and welding this onto the new support.
Center support Bearing
The original Audi 5000TQ driveshaft center support "bearing" was also available separately.
OTHER NOTES:
When removing the driveshaft allen bolts, make sure you clean out the hex head area, and tap in the allen socket you are using to loosen these bolts otherwise the internal hex head can strip out. Audi recommends replacing these bolts when servicing the driveshaft.
Make sure you use a 6mm allen socket with a good sharp bit end and first break the allen bolt loose with a flex handle, then you can you use an impact wrench to finish spinning them out.
The factory uses Red loctite on these bolts and they often are VERY tight and can seize up when you try and remove them. I have found that applying some heat to the hub area using a propane torch will allow these loctited bolts to spin out without too much effort. You want to be very careful using the propane torch, and make sure you only heat up the transmission or rear differential drive hub, and not the CV joint itself. Audi recommends you run a 8mm 1.25 pitch tap through the bolt holes in the transmission drive hub, and in the rear differential drive hub before re-installing the driveshaft to avoid problems when using new bolts with the pre-installed red loctite.
If you do strip out the inside of the hex head, you can sometimes use large vice grip plier to grab the outer head of the bolt and crack it loose. You can also use a power hacksaw (Sawsall) to completely cut the head off the bolt and then pull the drive shaft out. You can then use vicegrips to grab the bolt shaft to turn it out. This assumes one end of the driveshaft is all ready removed so you can slide the shaft forward or rearward to slide it off the left over stud with the head cut off.
In order to remove the center support from the driveshaft, you need to first remove the grease zirk fitting from the center U-Joint, then loosen the 19mm bolt holding the two piece driveshaft together. Once you loosen this bolt enough, you can use a large screwdriver to pry against the U-Joint and the bolt to force the front part of the driveshaft out of the splined shaft. A press may be required on stubborn or corroded driveshafts. Once the two piece driveshaft is separated, you can use a thin punch to push off the center support bearing from the front section of the driveshaft.
When installing the center driveshaft, make sure you center the drive shaft front to rear, by pushing it as far forward as it will go, mark the position of the center support bracket, then push it back to the rear as far as it will go, mark the bracket position, and finally move it half way back forward. Also make sure the side to side alignment is correct and straight, adjust as necessary. The up and down position of the center support should also be checked to make sure the two piece driveshaft sections are lined up. This is adjusted as necessary by adding or removing spacers between the body and the center support bracket.
Center Differential Diagram for 1986-88 5000TQ
Photo courtesy of Robert Bentley
1. Pinion 2. Hollow Shaft 3. Center Differential 4. Synchronizer Sleeve 5. Driveshaft Flange (front to rear) 6. Differential Lock Indicator Light switch 7. Input Shaft 8. End Cover 9. Differential Lock Control 10. Synchronizer Hub 11. Clutch Hub (center differential) 12. Shift Fork for center differential
RATTLING NOISE COMING FROM MANUAL TRANSMISSION WHEN IDLING, 1989-90 Audi 200
My 1989 200TQ made a rattling noise when the engine was idling and the clutch pedal was released with the transmission in neutral. Audi issued a service bulletin outlining this problem on the 89-90 Model year 200T and 200TQ, and mentions that the original style clutch disc does not dampen out the engine oscillations that are causing the gears in the transmission to rattling around against each other. This was fixed in production vehicles after VIN KN088590 (June 1989) by using the new Audi part number clutch disc 035-141-033HX This rattling could be a result of the lighter flywheel (flat type) used in the 1989-91 200TQ (10V and 20V). The 1992 and later S4 engines used a dual mass flywheel with internal spring dampers to reduce the engine torsional vibrations from being transmitted to the transmission and drive train.
New Style Clutch Throw
out bearing (Clutch releaser), To Grease or not to Grease, that is the
question: 1. Metallic releaser - To Be Greased 2. Non-Metallic Releasers - Pre-Greased 3. Non-Metallic Releasers - NOT to Be Greased
Flywheel Bolt Torque - Revised procedure
Audi issued a "Technical Bulletin" Group 13, Number 91-03 and Number 91-04, Dated June 30, 1991 New Flywheel Mounting Bolts, Revised Torque for: 1991 Audi 200 with 3B engine code, 1990-91 Audi 90 Coupe with Engine Code 7A, 1988-91 Audi 80/90 with Engine Code NG, 3A 1989-91 100/200 with Engine Code MC or NF
"New flywheel mounting bolts, revised tightening torque.
Effective immediately, flywheel bolt N 902 061 01 "without" shoulder is no longer available. Old torque for this obsolete bolt was 74 lb-ft.
The replacement bolt part number is N 902 061 03 "with" shoulder, and requires a revised tightening torque for installation.
NEW Torque procedure: Torque to 22 lb-ft, then tighten the bolt an additional 1/4 turn (90 Degrees)
NOTES:
USE DIAL TYPE TORQUE WRENCH. DAMAGE MAY RESULT FROM USE OF A "CLICK" TYPE TORQUE WRENCH
Additional 1/4 (90 degree) turn may be done in two 45 degree steps Always replace bolts, do not reuse old bolts Threads of replacement bolts are pre-coated with locking compound
If you have the flywheel machined or ground flat during a clutch replacement, make sure the timing pin is installed after the flywheel is ground. The pin is often removed by machine shops when grinding the flywheel. The engine won't start if this pin is left out and getting it back in may require you to remove the transmission and flywheel again.
I measured the timing pin depth on the flat style flywheel from the 1991 200TQ 20V. The pin for the TDC sensor which is located on the front face of the flywheel between the engine block and the flywheel protrudes 0.475 inches. The long pins on the rear face of the flywheel protrude out 1.420 inches. It is my understanding that these long pins were used with factory test equipment initially when the car was manufactured in Germany.
The Clutch Pressure plate alignment pins on the rear face of the flywheel protrude 0.390 inches.
The later 200 MC engine flywheels weigh 16-17 lbs and has a flat design, this compares to the early MC engine flywheel that weighs in at 23 lbs and has a recessed disk contact area. This lighter flywheel was used in the later 1989-90 200TQ dual knock sensor MC engine and in the 1991 200TQ with the 20V Turbo. Here is a photo of this flat style flywheel.
Small Leak from side of Transmission
If your transmission is leaking slightly from the right side and it drips down near the axle, check for loose bolts (Three 10mm head bolts) on the small triangular shaped plate on the side of the transmission above where the axle comes out. I have found several Quattros with minor leaks from this area due to a loose plate.
Quattro Transmission Weight
While I was doing the clutch on my 89 200TQ, I decided to weigh the transmission using my bathroom scale, and unfortunately, it weighs less than I do. Looks like a diet is in order.
Transmission came out to weigh around 160lbs, this was the Torsen version of the O16 designated as the AOA.
GEAR RATIO INFO
CLUTCH HYDRAULIC SYSTEM
The Clutch Hydraulic system on the Audis is often overlooked during preventative maintenance. The fluid in the clutch hydraulic system comes from the brake master cylinder reservoir and should be replaced (flushed) on an annual basis. This "brake" fluid is hygroscopic and will absorb moisture over time. Flushing the brake system fluid will not get the fluid flushed out from the clutch master and slave cylinder. Over time this old fluid absorbs moisture which can cause failure of the master cylinder and slave cylinder due to corrosion and pitting of the internal cylinder surface. This pitting will cause the rubber cups on the piston to get cut and fail to hold pressure when pushing the clutch pedal in. This failure of the hydraulic system will cause the clutch pedal to go all the way to the floor and stay there.
Flushing the clutch hydraulic system is tough if you try to use the conventional method of using an assistant who pumps the clutch pedal while you open the bleeder. Sometimes this will work, but I recommend using a pressurized bleeder system to speed up the process. You can make one of these by taking an old master cylinder cap and attaching an air hose fitting. The air hose should be connected to a pressure regulator to provide 5-10 psi of air pressure into the top of the brake master cylinder. You can use a portable air tank or a regular air compressor to supply the pressurized air to the regulator. After checking for major air leaks at the cap, you can apply the pressurized air to the brake master cylinder reservoir and then open the clutch slave cylinder bleeder valve at the slave cylinder which is mounted near the top front area on the transmission. I suppose you could also use a hand operated bicycle pump to pressurize the master cylinder while leaving the clutch slave cylinder bleeder valve open.
As mentioned, the clutch master and slave cylinder will often fail if the fluid has not been flushed on a regular basis. This seems to happen most often as the vehicle accumulates over 100k miles . I would recommend replacing the master and slave cylinder as a maintenance item if your vehicle has over 100K miles on it and you don't know if the clutch hydraulic fluid has ever been changed. This can avoid getting stuck out in the middle of now where with a dead clutch pedal resting on the floor. See below for details on clutch pedal breakage that can also occur on high mileage Audis.
CLUTCH PEDAL BREAKAGE-Audi 100/200/S4/S6
I had the clutch pedal break on my '89 200TQ when it had 110k miles on it. This surprised me a bit as I never expected this component to fail. The pedal broke near the lever arm that connects to the clutch master cylinder piston rod. There were also signs of cracking at the plastic bushing that supports the clutch pedal. This could be a major pain in the butt if you are many miles from home or a repair shop, as the car is pretty tough to drive without the clutch! You can get moving by turning off the engine, shifting into first gear, and then start the engine with the brakes released. The car will jerk a bit as it starts but at least you can get moving. Sometimes if you match the engine speed, you can shift to higher gears to make it to a repair shop. I was lucky as I was only a few miles from home when the clutch pedal snapped. This is not something you want to happen out in the boonies during a road trip!
After talking to another 200TQ owner who also had his clutch pedal break "twice", this failure appears to happen more often than I realized. If the clutch master cylinder piston rod is mis-adjusted the master cylinder piston could bottom out in the bore before the clutch pedal stop hits the carpet/firewall. This could place additional stress on the pedal arm and cause the breakage. The clutch master cylinder should probably be replaced at the same time you are replacing the pedal as a sticking master cylinder could also cause this pedal to break. It also makes sense to replace the clutch master cylinder while you are down there working on the pedal assembly. The local Audi dealer in my area has this clutch pedal 'in stock'. What does that tell you about how often it can fail? It is very difficult to see up in the pedal assembly area to check the condition of the clutch pedal, so if your Audi has over 100k miles, you may want to go ahead and replace the pedal to avoid any possible breakdown in the future.
One of my customers who owns a 1995 S6 had the operating push rod break on the clutch master cylinder. Be sure to check the length adjustment of this shaft when you replace the clutch master cylinder to avoid having the master cylinder piston bottom out in the bore, which could place too much stress on the push rod.
If you have to replace the clutch pedal assembly, use caution when removing and installing the clutch pedal as the return spring is under a fair amount of tension and can fly out and hit you in the head or eye. Audi makes a special tool that captures the compressed spring and allows insertion and connection to the clutch pedal and support.
If the clutch pressure plate is binding when the clutch pedal is depressed (during pressure plate release) or the release lever is making a creaking noise, this is another sign which may eventually cause the clutch pedal to break. The pressure to operate the clutch pressure plate increases as the clutch disk wears and this increases the clutch pedal pressure required.
On my car, I ended up replacing the clutch assembly after I installed the new clutch pedal and clutch master/slave cylinders, because I noticed the clutch pedal required more force than another 200TQ I drove the same day. When I looked underneath the dash and pushed on the clutch pedal with my hand, I noticed the whole clutch and brake pedal assembly was tweaking/moving during this clutch pedal actuation. The clutch pressure plate and release lever were binding so bad, that the force required by the clutch pedal was extremely high to push the master cylinder piston and provide enough hydraulic pressure.
After installing the new clutch assembly, the clutch pedal pressure is lower than before.
There was a design change to the clutch pedal and the clutch hydraulic system on the '89 200TQ when compared to the '86-88 5000TQ. The clutch pedal design is slightly different and has a stop on the lower portion of the pedal. The upper area of the pedal looks to be the same as the earlier 5000TQ design. The clutch master cylinder design is different on the '89 200TQ as the new design moved the fluid inlet out of the way from the allen mounting bolt flange. The clutch slave cylinder mounting at the transmission is also different on the '89 200TQ as this cylinder now uses a bolt to hold it to the transmission instead of the roll pin that was used on the '86-88 5000TQ. I would recommend replacing this slave cylinder at the same time you replace the clutch master cylinder.
Copyright © SJM Autotechnik™ , all rights reserved
Return to Troubleshooting Tips page. Return to SJM Autotechnik™ main page.
|
| About Us Privacy Policy Terms of Use Links Customer Service Safety Information Home |